The Ultimate Guide to Designing Durable and Beautiful Pebble Walkways
por Bruno Martins en May 25, 2024

Introduction to Pebble Walkways
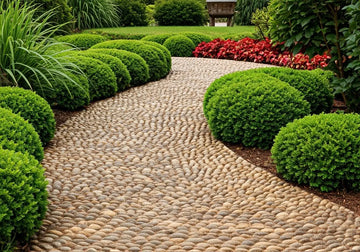
Pebble walkways are more than just a path to walk on; they add beauty and a natural feel to any outdoor space. They’re made by setting small, rounded stones, known as pebbles, into a sand or mortar base. This simple yet elegant solution brings texture and a touch of nature to gardens, patios, and yards. One of the best things about pebble walkways is their versatility. You can choose from a wide array of pebble colors, sizes, and shapes to create a design that’s uniquely yours. Plus, they are durable and can withstand the elements, making them a great choice for any climate. Whether you’re aiming for a rustic look or a more polished appearance, pebble walkways offer the flexibility to achieve your desired style while ensuring longevity and ease of maintenance.
Importance of Choosing the Right Materials
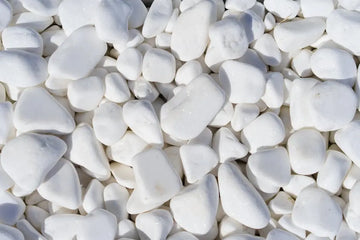
Choosing the right materials is the core step in designing pebble walkways that are not only beautiful but last long. You’ve got to keep in mind that all pebbles are not created equal. Some are tougher, able to withstand heavy foot traffic without being worn down quickly. Others, while maybe more attractive, could be softer and less durable, meaning they won’t stand the test of time or weather. It’s not just about picking the prettiest stones; functionality is key. For instance, river pebbles are a popular choice due to their smooth surface which is comfortable to walk on and their varied, natural color palette that can complement any landscape design. However, if your walkway is going to see a lot of action or is in an area with harsh weather conditions, you might consider granite pebbles. They are one of the hardest materials, ensuring longevity and resilience against the elements. On the flip side, limestone pebbles might be tempting with their unique textures and colors, but they’re softer and might not endure as well. So when you’re choosing materials for your pebble walkway, think about the traffic it will need to support and the weather it needs to withstand. This isn’t just about beauty; you’re investing in durability and functionality to ensure your walkway remains a lasting feature of your outdoor space.
Planning Your Pebble Walkway Design
Before you grab a shovel and start laying pebbles, taking a step back to plan is essential. Creating a durable and beautiful pebble walkway starts with good design. Sketch out your idea. Think about where the path will go, how wide it should be, and if it’ll curve or go straight. Next, decide on the type of pebbles. Sizes, colors, and textures vary, so choose ones that match your garden’s style and can withstand foot traffic. Consider the edging too; it keeps pebbles in place and defines the walkway’s shape. Planning might seem tedious, but it’s the foundation of a walkway that combines functionality with aesthetics.
Preparing the Ground for Installation
Before you lay down any pebbles, getting the ground ready is crucial. It’s all about creating a solid foundation. Start by digging out the area to a depth of about 6 to 8 inches. You’re making room for layers that will secure your walkway. First, throw in a layer of gravel. This helps with drainage, so you don’t end up with a soggy path after every rain. Aim for about 3 to 4 inches of gravel. Next, top it off with sand. About 2 inches will do. Sand makes your surface level and gives something for the pebbles to stick to. Once you’ve got your gravel and sand down, it’s time for compaction. Use a hand tamp or a compactor to press down this base layer. It has to be firm. If it’s loose, your pebbles won’t stay put. Think of it like building a house; you’d never put up walls without a solid foundation. The same goes for your pebble walkway.
Laying the Foundation for Durability
When it comes to building a pebble walkway that lasts, laying a solid foundation is key. Skipping this step is like building a house on sand – eventually, it’ll give way. Start by digging about 6 to 8 inches deep to make room for the base layers. This depth ensures your walkway stays put, come rain or shine. First, lay down a landscape fabric to block weeds from poking through – trust me, you’ll thank yourself later. Next up, put down a 3 to 4-inch layer of crushed stone. This acts like a sturdy bed, giving your pebbles a strong ground to settle on. Compact this layer well to make a firm base. Only then do you pour in your pebbles, spreading them evenly to create your walkway. Doing it right means you’ve got a durable and beautiful path that won’t crumble at the first sign of trouble. Remember, a strong foundation is not just about preventing sinking; it’s about creating a lasting impression.
Selecting and Arranging Pebbles for Aesthetics
Choosing the right pebbles is key to creating a walkway that’s not just durable but also pleasing to the eye. You want a selection that offers a variety of colors, shapes, and sizes to create an interesting and harmonious look. Think about the color scheme of your garden or yard and pick pebble colors that complement or contrast nicely with your surroundings. When arranging them, aim for a balance between uniformity and randomness for a natural look. Larger pebbles can serve as a border or accent pieces, while smaller ones fill in the space, providing stability and preventing too much shifting underfoot. Remember, the goal is to blend functionality with aesthetics, ensuring your pebble walkway is as beautiful as it is practical.
Techniques for Securing the Pebbles
When it comes to making pebble walkways that last and look good, getting the pebbles to stay in place is key. Here’s how you nail it without making things complicated. First off, choose the right pebble size – too big and they won’t stick well, too small and they’ll scatter easily. Look for pebbles sized between 1⁄4 inch to 1⁄2 inch for the best balance. Next up, is laying down a solid base. Start with a layer of compacted sand or gravel. This makes sure your pebbles have a tough foundation and don’t shift easily. After that, when you place the pebbles, press them firmly into the base layer. This isn’t the time to be gentle; make them snug. Lastly, lock them in place with a binding solution. This can be a sealant or epoxy resin designed for outdoor use. It’s like putting glue on your pebble walkway; it keeps everything tight and right. If you do all this, you’re looking at a pebble walkway that stays good-looking and sturdy for years. No messing around; that’s how it’s done.
Maintenance Tips for Long-lasting Pebble Walkways
Keeping your pebble walkway looking good and lasting long doesn’t need to be complicated or time-consuming. First, remember to regularly sweep it clean. Leaves, dirt, and debris can make it look messy and can also lead to wear over time. Secondly, washing it down with a hose every now and then keeps the pebbles looking fresh. Be gentle; you don’t want to displace them. If weeds start showing up, pull them out quickly or use a safe herbicide. Weeds can spread and cause more damage if left unchecked. Lastly, check for loose pebbles and secure them back in place. This helps in preventing any gaps or uneven surfaces. Simple, right? Stick to these tips, and your pebble walkway will stay beautiful and durable for years.
Common Mistakes to Avoid When Creating Pebble Walkways
When making pebble walkways, it’s easy to slip up if you’re not careful. First off, skipping the planning phase is a no-go. You need to sketch your path, understanding where it’ll go and how it’ll look. Think about width and direction. Ignoring this step might leave you with a walkway that looks out of place or isn’t functional. Next, don’t underestimate the importance of a solid base. Without a sturdy foundation, those pebbles will scatter, and the path will become uneven over time. A mix of gravel and sand usually does the trick for a base that keeps everything in place.
Another common mistake? Not using the right materials. All pebbles aren’t the same. Some hold up better under frequent foot traffic or harsh weather. Pick the type that suits your climate and usage.
Also, watch your edges. Undefined edges make for a messy look and can lead to pebbles straying onto your lawn. Installing edge restraints keeps your walkway tidy and intact.
Skipping on weed prevention is asking for trouble. Without a layer of landscaping fabric beneath your pebbles, you’re basically rolling out the welcome mat for weeds to settle in.
Lastly, overlooking the importance of compaction and depth. Compacting your base layer adds to the durability of the walkway. And make sure your pebbles are deep enough - usually about 2 inches - so they don’t move around too easily but not so deep that walking becomes a chore. Avoid these mistakes, and you’re on your way to creating a pebble walkway that’s as sturdy as it is eye-catching.
Inspirational Ideas for Your Next Pebble Walkway Project
Looking to add charm and character to your outdoor space? A pebble walkway might just be the project you need. This path not only boosts your garden’s overall look but also offers a durable, low-maintenance solution that can withstand the test of time. Whether you’re aiming for a rustic vibe or a modern twist, there’s a pebble walkway design out there for you. Consider whimsical patterns that snake through your garden, providing both a practical pathway and an enchanting visual appeal. Or, opt for a simple, straight walkway with a mix of pebble colors for a minimalist yet striking look. For those who love a bit of creativity, integrating larger stones or stepping stones with pebble fillers can create a playful and inviting journey through your outdoor space. And don’t forget about lighting - adding solar lights along the edges of your pebble walkway can elevate its beauty and functionality, making it a standout feature at night. Each option not only adds value to your property but also creates a personal touch that reflects your style. So get inspired and start planning your next pebble walkway project today.


